Unleashing the Beauty: Discovering the Vibrant World of Parrot Fish
The world’s oceans are teeming with an array of colorful and fascinating creatures, and among them, the parrot fish stands out as a true marvel. Known for their striking appearance and crucial role in marine ecosystems, these fish are a testament to the beauty and complexity of underwater life. This article aims to explore the vibrant world of parrot fish, delving into their unique characteristics, behaviors, and the challenges they face in their natural habitat.
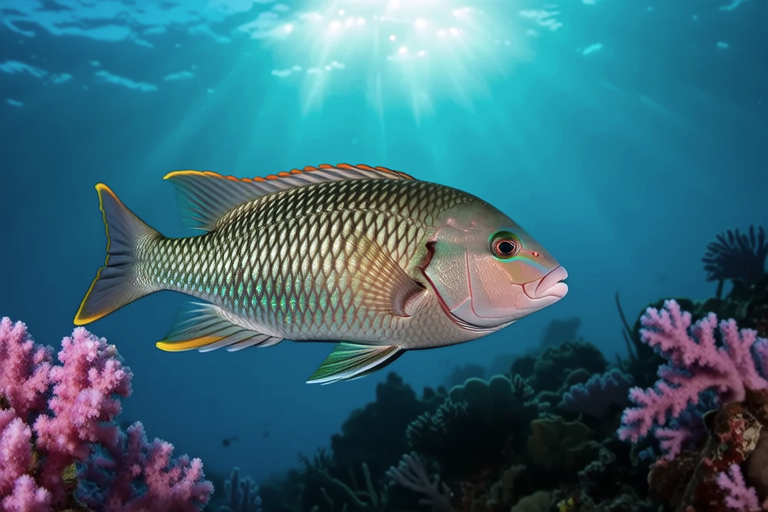
A Glimpse into the Unique Appearance of Parrot Fish
Parrot fish are easily recognizable due to their distinct appearance. Named for their beak-like mouths, these fish come in a dazzling array of colors, ranging from electric blues and greens to fiery oranges and reds. Their bodies are often adorned with intricate patterns that seem to shimmer under the ocean’s surface. The vivid hues and patterns are not merely decorative; they serve important functions in communication and camouflage, helping parrot fish navigate their complex underwater world.
The Role of Parrot Fish in Marine Ecosystems
Beyond their aesthetic appeal, parrot fish play a vital role in maintaining the health of coral reefs. These fish feed on algae that grow on coral surfaces, preventing it from overgrowing and choking off other marine life. By keeping the coral clean, parrot fish contribute to the overall balance and biodiversity of the reef ecosystem. Their feeding habits also result in the production of sand, as they grind up the coral they consume and excrete it as fine particles. This process helps maintain the beaches’ integrity along coastlines where parrot fish are abundant.
Vibrant Colors and Behaviors
One of the most fascinating aspects of parrot fish is their ability to change color. As they mature, their hues can shift dramatically, often becoming more intense and varied. During mating season, parrot fish display particularly vivid colors to attract mates. This transformation is not just visually stunning but also serves as a means of communication within their species. Males, in particular, undergo significant color changes to signal dominance and readiness to breed.
Parrot fish are also known for their social behavior. They often gather in large schools, swimming together in harmonious formations. This communal living provides protection against predators and facilitates efficient feeding. Their schooling behavior is a testament to the importance of cooperation in the underwater world.
Habitats and Adaptations
Parrot fish inhabit tropical and subtropical waters around the globe, particularly in regions with healthy coral reefs. They are found in both shallow and deeper waters, though they tend to prefer areas rich in coral growth. Their preferred habitats include lagoons, seaward reefs, and rocky coastal areas. These environments provide ample food sources and shelter, allowing parrot fish to thrive.
Adapted to their specific habitats, parrot fish have developed specialized teeth that form a beak-like structure. This adaptation enables them to scrape algae from coral surfaces efficiently. Additionally, some species of parrot fish possess a unique mucus cocoon that they secrete before sleeping. This protective layer shields them from predators and parasites while they rest.
Challenges Facing Parrot Fish
Despite their importance to marine ecosystems, parrot fish face numerous challenges in their natural environment. One of the primary threats is overfishing. Many species of parrot fish are highly sought after for their meat, leading to unsustainable fishing practices that deplete their populations. In addition, the destruction of coral reefs poses a significant threat to parrot fish. As reefs degrade due to climate change, pollution, and human activities, the parrot fish lose their primary source of food and shelter.
The degradation of coral reefs is exacerbated by factors such as rising sea temperatures, ocean acidification, and harmful fishing practices like dynamite fishing. These environmental stressors not only affect the physical structure of the reefs but also disrupt the delicate balance of the ecosystem, making it harder for parrot fish to survive.
Conservation Efforts and How You Can Help
To address these challenges, various conservation efforts are underway to protect parrot fish and their habitats. Marine protected areas (MPAs) have been established in many parts of the world to safeguard critical coral reef ecosystems and the species that depend on them. These protected zones limit fishing activities and promote sustainable management practices.
In addition to supporting MPAs, there are several actions individuals can take to help conserve parrot fish:
- Support Sustainable Seafood Choices: Choose seafood products that are certified as sustainably sourced. Look for labels indicating responsible fishing practices and minimal impact on marine ecosystems.
- Reduce Plastic Waste: Minimize your use of single-use plastics and properly dispose of waste to prevent it from entering the ocean. Marine debris can harm parrot fish and other marine life.
- Advocate for Policy Changes: Engage with local and national policymakers to advocate for stronger protections for marine environments and wildlife.
- Educate Others: Raise awareness about the importance of parrot fish and the threats they face. Share information with friends, family, and community members to inspire collective action.
By taking these steps, individuals can contribute to the preservation of parrot fish and the health of our oceans. Together, we can ensure that future generations will continue to marvel at the vibrant world of parrot fish and the wonders of marine life.
Conclusion
The parrot fish is a captivating creature that exemplifies the beauty and complexity of marine ecosystems. From their striking appearance to their vital role in maintaining coral reefs, these fish offer a glimpse into the interconnectedness of life beneath the waves. However, the challenges they face underscore the urgent need for conservation efforts. By supporting sustainable practices and advocating for marine protection, we can help ensure the survival of parrot fish and the vibrant world they inhabit.